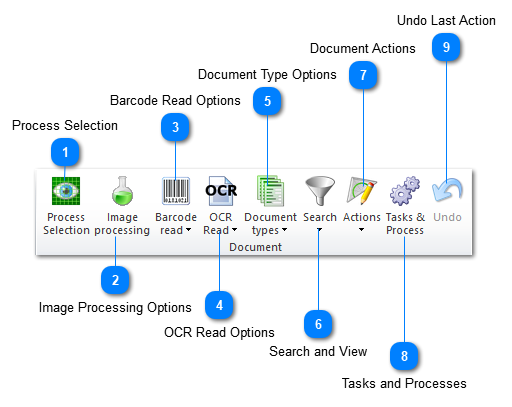
3.5.3.3. Document Toolbar
This toolbar allows you to manage document types, search certain documents, configure OCR read and
Barcode reading and
 Process SelectionAfter setting up all the OCR Fields and Grids and other reading settings select the documents you
select the desired tasks before and after processing and click OK.
|
|
 Image Processing Optionsit is possible to access advanced image processing options for the whole batch to improve OCR results.
|
|
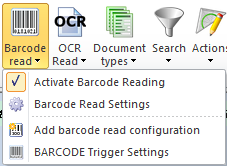
 Barcode Read OptionsThe Barcode Read Options button allows you to enable barcode reading,
add barcode readings and to setup barcode triggers.
|
|
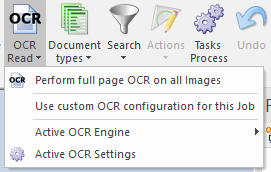
 OCR Read OptionsThe OCR Read Options menu allows you to setup OCR reading and to select the desired OCR engine.
It is good practice to test different engines for the same documents if the current selection is
returning too many errors. It is also important to select the desired language or
languages from the Active OCR Settings menu.
|
|
|
Options presented by the OCR Read menu.
|
You can change the Active OCR Engine by selecting one from the Active OCR Engine
menu and tweak it's settings by clicking on the Active OCR Settings options.
By default the selected configuration is global, but when
"Use custom OCR configuration for this Job" is selected an exclusive configuration will be created for the current Job.
|
|
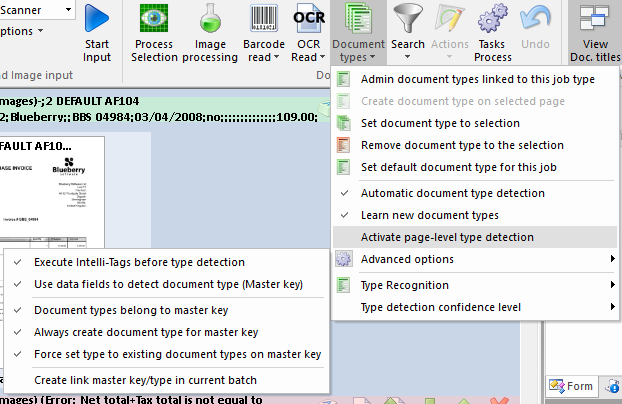
 Document Type OptionsThe Document Types button will open up the Document Types menu.
NOTE: Only use the Advanced Options if you are using a Masterkey Job and if you know what you are doing.
If you do not know what a materkey job is all the options inside the Advanced option menu should be disabled (deselected).
|
|
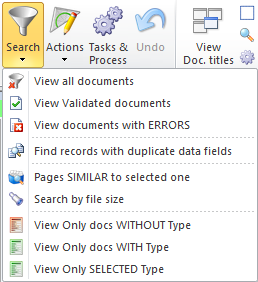
 Search and ViewThis menu will give View options based on the selected criteria.
|
|
|
View and Search Criteria options. If you want to view all documents select view all documents.
|
NOTE: Do not forget to click on the View All Documents option when you want to see all the documents in the batch again.
|
|
 Document ActionsThe actions menu is documented here. This menu includes many useful document and batch actions.
|
|
 Tasks and ProcessesIt open the possibility to perform actions during input time and during export time.
|
|
 Undo Last ActionUndo actions like manual split, removing documents from batch and other document operations.
Most of the actions on ChronoScan are not undoable.
|
|